Sunday, 17 March 2013

Happy Birthday my Rob...

Thirty two years ago today I was in Oxford St Maternity Hospital (where John Lennon was also born, interestingly!) awaiting the arrival of my number three (numerically speaking!) son, Robert Brian and had just had a shower and was nice and comfy in my bed awaiting the 'serious' business of childbirth.

Apart from the awful chest infection I had (kindly provided by an infected and coughing  'friend' who came to visit a couple of days before, knowing I was due to give birth (what is wrong with these people?) this birth was a doddle.

My two previous babbies had been 6lb-odd tiddlers. The births hadn't been bad at all, but long.  This lickle Rabbit turned out to be a just on 9lb 'cube' (only 17" long next to his brothers' 21") and popped out like a lickle ping-pong ball!  

Anyway, enough gory details! LOL! I can't upload a pic of the card I've made for my gorgeous Rob as my PC is still fannying about and won't speak to any imaging devices.  I guess I could try to scan it but that's really not a good way of imaging creative works....I'll have a go and see how it looks but I guess for the minute I'm just saying Happy Birthday to my Rob!

Hugs
Ei
x


Okay, so I did a scan......Rob's an ecologist, hence the badgers!


Saturday, 16 March 2013

Last Rose of Summer - Steampunk

The trouble I've had trying to get a pic of this is ridiculous!
My PC has decided to cut all communications with 'storage devices' ie card-readers, flash sticks, mobile phone.....!   I've had to take the pic with my phone then e-mail it to myself! Now the camera on my phone isn't bad but it isn't the 300dpi I would normally choose for resolution!

So the pic ain't great but it's all I can do until I get my PC looked at by someone who knows what they're doing.


...oh it's even worse than I anticipated......

Oh well, there's nothing I can do until Monday now but I'll try to get another.

The papers are Graphic 45 'Steampunk Debutante' - I just LOVE that rose paper.

The image is, of course, the splendid Last Rose of Summer' from the Steampunk Collection at 'Simply B' stamps 

I love this digi-stamp range they're proper graphic illustration standard drawings from a talented artist.

I am not at all enamoured of all these dysmorphic big eyed and big-footed girls that are so popular at the minute - I can't use them at all, preferring more arty images.  Tilda is about as cute as I get and I've not used them for a while either.

But this Steampunk range is the business!  Just love them and wish I was talented enough to come up with similar standard drawings.

I've just bought a few more so watch out for some more from this range!

Hugs
Ei
x


I've entered this at Simply Steampunk Challenge and will also be answering the DT call there


Finally fixed my pc - hope it stays that way! I HATE techie probs - so long winded!

Here is the proper pic of 'Last Rose' - too late for the DT call but here it is anyway.


Slightly different wouldn't you say....? LOL!


Friday, 15 March 2013

Busy, busy month...! LOL!

Well, Bill & Margie and then Mother's day, now it's my brother Alan's Birthday today and I've made him this card....


I'd been chatting on Skype with a crafty chum and she wanted to know how to use her Distress inks so, I gave her a few ideas including making your own backing papers.  

I also demonstrated it whilst she watched to show just how easy it is and when I'd finished, decided I liked the demo-ed papers enough to use them on my brother Alan's card. 

I also used a sketch by a friend of mine JanJanetta from Trimcraft home forum - we co-host the monthly Sketch challenge on our forum, taking turns of piece setting the sketch.


Materials
Paper
Teflon workmat (Poundshop oven sheet is fine)
Distress inks
Water spray
Glue or gum
Embossing powder or mica
Drinking straw (optional)


The method is almost too easy to describe!

1) Have your Teflon mat open on your worktop.
2) Drop a few drops of Distress inks (your own choice of colours) Randomly over the mat.
3) Spritz with your water spray
4) Plop your paper face down on the mat and 'zhuzh' around the mat, soaking up the colour.
5) Clean your mat (or if you're posh, have a second one ready!) and place your wet paper face up on it.
6) Alter as pleases you. More ink if required or spread some gum randomly over it, sprinkle with embossing powders/mica and heat with heat gun. Be prepared for steam and bubbles! As the water vaporizes, and the glue bubbles in the heat, it creates interesting textures.

And that's it! Your paper is made. Do what thou wilt with it!  Mad as it might look, don't bin it - you'd be surprised how well it looks once mounted on your card!

The black 'ribbon' on the card isn't ribbon at all - it's rubber from a strip that fell off the back of one of Nic's belts!  Much more macho than ribbon.....!

Alan liked it anyway......

Hugs
Ei
x


Friday, 8 March 2013

Two 60th birthdays...

I have two very wonderful peeps with birthdays this week. 
My gorgeous, perfect daughter-in-law's parents both have their special days - one tomorrow and one next week.

Margie is a little dynamo of a lady - only 4' 8" and a size eight but she is a force to be reckoned with! I wish I had half of her energy!

For Dani's Mum, Margie I played it straight with a pretty, floral card in lilac, purple and white.


For her Dad Bill 'the Builder', I was a bit cheeky - he does like a laugh and will take it from me in good humour!


The brilliant image is a Jak Heath image from Just Inklined

I also made a mini-card for the inside with a lickle verse in it.....


I hope they like them - well, I know they will because they're lovely peeps who appreciate the effort put into handmade cards.

Hugs Ei x

I've entered Margie's card into the Allsorts challenge for this week as she is definitely 'A Lady'.

I've entered Bill's card into Crafty Cardmakers challenge because he has a gadjet - his souped up zimmer frame! LOL!

Friday, 1 March 2013

Steampunk Junkies! -Challenge 1 - Flight

Well, it's here! My first duty on Steampunk Junkies' Design Team!

They're an amazing bunch of ladies - really fun and laid back but with lots of good energy too. Do pop over and check out all their blogs because we are all so very different in our styles!

This is going to be somewhat of a challenge to me...! I love Steampunk but find it hard to make original ideas in keeping with the true nature of Steampunk. It's more than just buying some paper the manufacturer TELLS you is Steampunk - it has to feel right too and that's where I'm a little afraid of coming unstuck!

I've made a few 'Steampunk' esque projects and each has been harder to me than your normal flouncy flowery card with a coloured image on it - I can knock those out by the dozen and will usually make a decent fist of it. Not so the 'Steampunk' style - it's so easy to get wrong...!

Anyway, here's my first contribution to the new and improved Steampunk 
Junkies blog!

Steampunk Copper-Covered Phone Case                    


It was quite hard to photograph because of the reflection on the copper cover.

I cut out a piece of thin copper metal to fit the phone case and passed it through my BigShot in a Sizzix embossing folder.

The metal was then trimmed and bent round the case and an aperture cut for the camera lens and I used a ribbon-punch to cut out two 'vents' for the microphone. 

That done, I then glued it to the case with E600 clear glue and clamped it with elastic bands in a Spanish Windlass style. I also employed a couple of clothes pegs!

Once that was relatively secure, I adhered a metal-look trim around the outside edge to preclude any sharp edges or corners.

The next step was to adhere embellishments such as the birds and a butterfly (as these are beings of flight) a few feathers and time-piece cogs (well, time flies, doesn't it...? LOL!) and finished off with a cheeky witch on a broomstick.  All adhered with E600. I then used Pinflair glue-gel to adhere the copper beads as it needed a fine nozzle.

To complete, I used some bronze and black metal-wax into the recesses and polished off the contours.

My husband has already told me he won't be using this particular 'skin'....  I wonder why not...?
LOL!

Pop over to the blog and join in the challenge!

Hugs Ei x

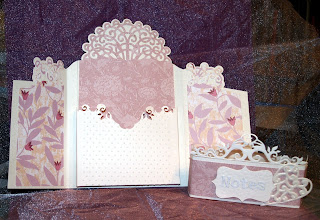
Spellbinder Notecase

I've bought a few Spellbinders recently - some really pretty designs have been forthcoming lately - and one of the sets I bought was this one - Layered Elegant Swirl from Heartfelt Creations.

I awaited it with great anticipation - I'm a great admirer of the versatility of Spellbinders dies - you can do so much with them....except this one.

I was so disappointed, it's hard to overstate the case.  This is what you get.


Now, they top 'arch is one piece and cuts out to a pretty, filigree arch. No prob with that - just how it looks on the tin - as long as you use it on the edge of your card or are prepared to use a knife to remove it from the card from which you just cut it.... The cutting edge doesn't join up.

The other pieces are also part of a jigsaw.  The two swirls are mirror images of the same thing - nice idea so you can put them on opposite corners but they aren't designed to cut out in a piece - the ends don't 'join up', so they make a kind of fancy flap.   

I had to go hunt down a video to see how they're meant to work as none of them join up. 

I found just two. Heartfelt Creations own and a re-do of the HC one by another crafter. The SAME project.

So, I did more digging and also e-mailed Heartfelt creations who sent me a reply telling me to look in their own gallery which I already had done and found....the same project.  True, a couple of peeps had used the arch bit as a kind of background - like a doily - but you know, I already have doily dies and they didn't cost me £24.00!   Very expensive for a one-trick pony in my book!

I was cross and did consider returning it (and could have as the packaging gives the impression of individual dies) but I decided to keep it to see if I could make it do other tricks.  So far - nada! But I will keep trying as refuse to be beaten by a stoopid die.

My other bugbear with it is that it could have been outstanding if they had just included the outline dies complete, so you could cut panels to paste the filigree bits onto in a different colour, making layers - how great would that have been? And that too would have explained the exorbitant price.

It makes, in its intended state, just one card  8" x 4.75" max - oh and you need a Calibur or a Pro if you want to cut it out in one without folding any of the card before cutting or trim your A4 card first.

The project is undoubtedly pretty  (I made it into a notecase set with a bellyband and a little card holder inside) but £24.00 worth...not in my book.
For that money I would have expected more versatility.


My advice to anyone taking a fancy to this die set would be to watch the video first as not everyone would be happy with it. It's quite fiddly and less experienced crafters might well have their confidence knocked by it.

(No doubt by now you more than likely can get this set for a lot less on e-bay but it wasn't available there at the time any cheaper than I got it.)

My main beefs a though were:
a)  The packaging gives the impression of individual stand-alone dies - they're not. Which means..

b)  Not versatile at all. One-trick pony. None of which would matter if it wasn't ...

c) Too expensive! Which it wouldn't be if....

d) there were extra outline dies.

I like the project I made with it well enough (with other dies added - the heart, the plaque and the top flourish) but how many times would you use this particular project?  Fine if you've a wedding or invites to make but it would take you ages to cut a lot of them.

Verdict :- Pretty set but limited use and too expensive as it is.

Hugs Ei x


Lots going on at Chez Eiglas... ;)

I've been home from work now for nearly three months - and it has been wonderful...! I've drawn, painted, had an amazing time with ...